|
|
||||||||||||||||||||||||||||||||
Foundry
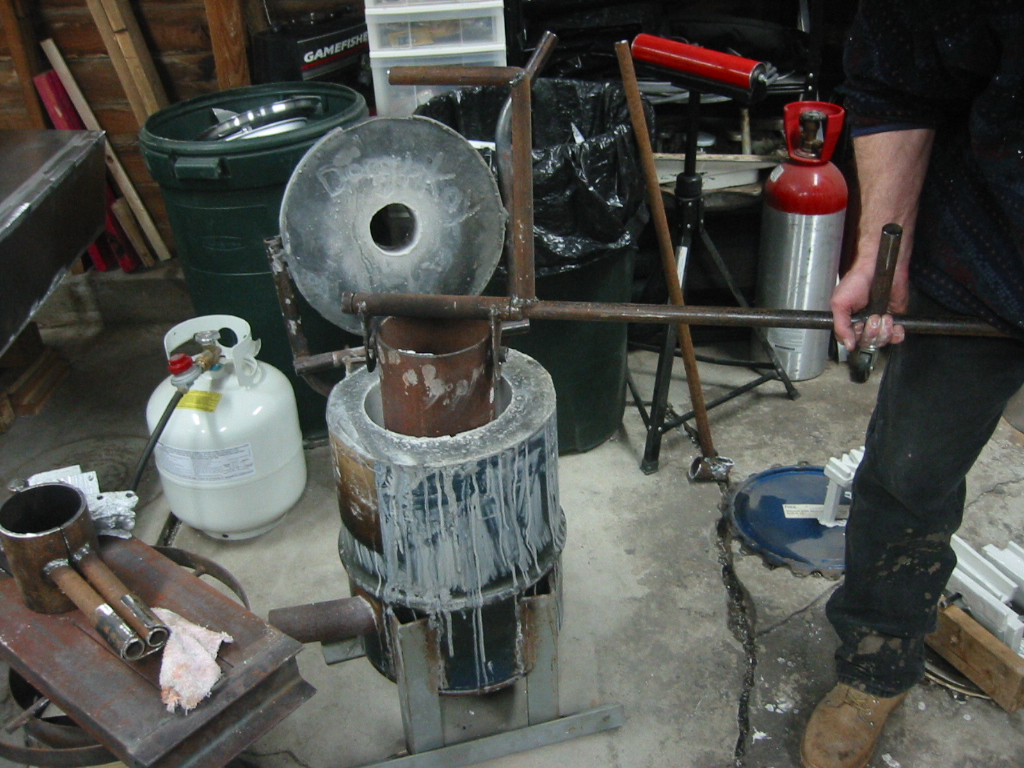
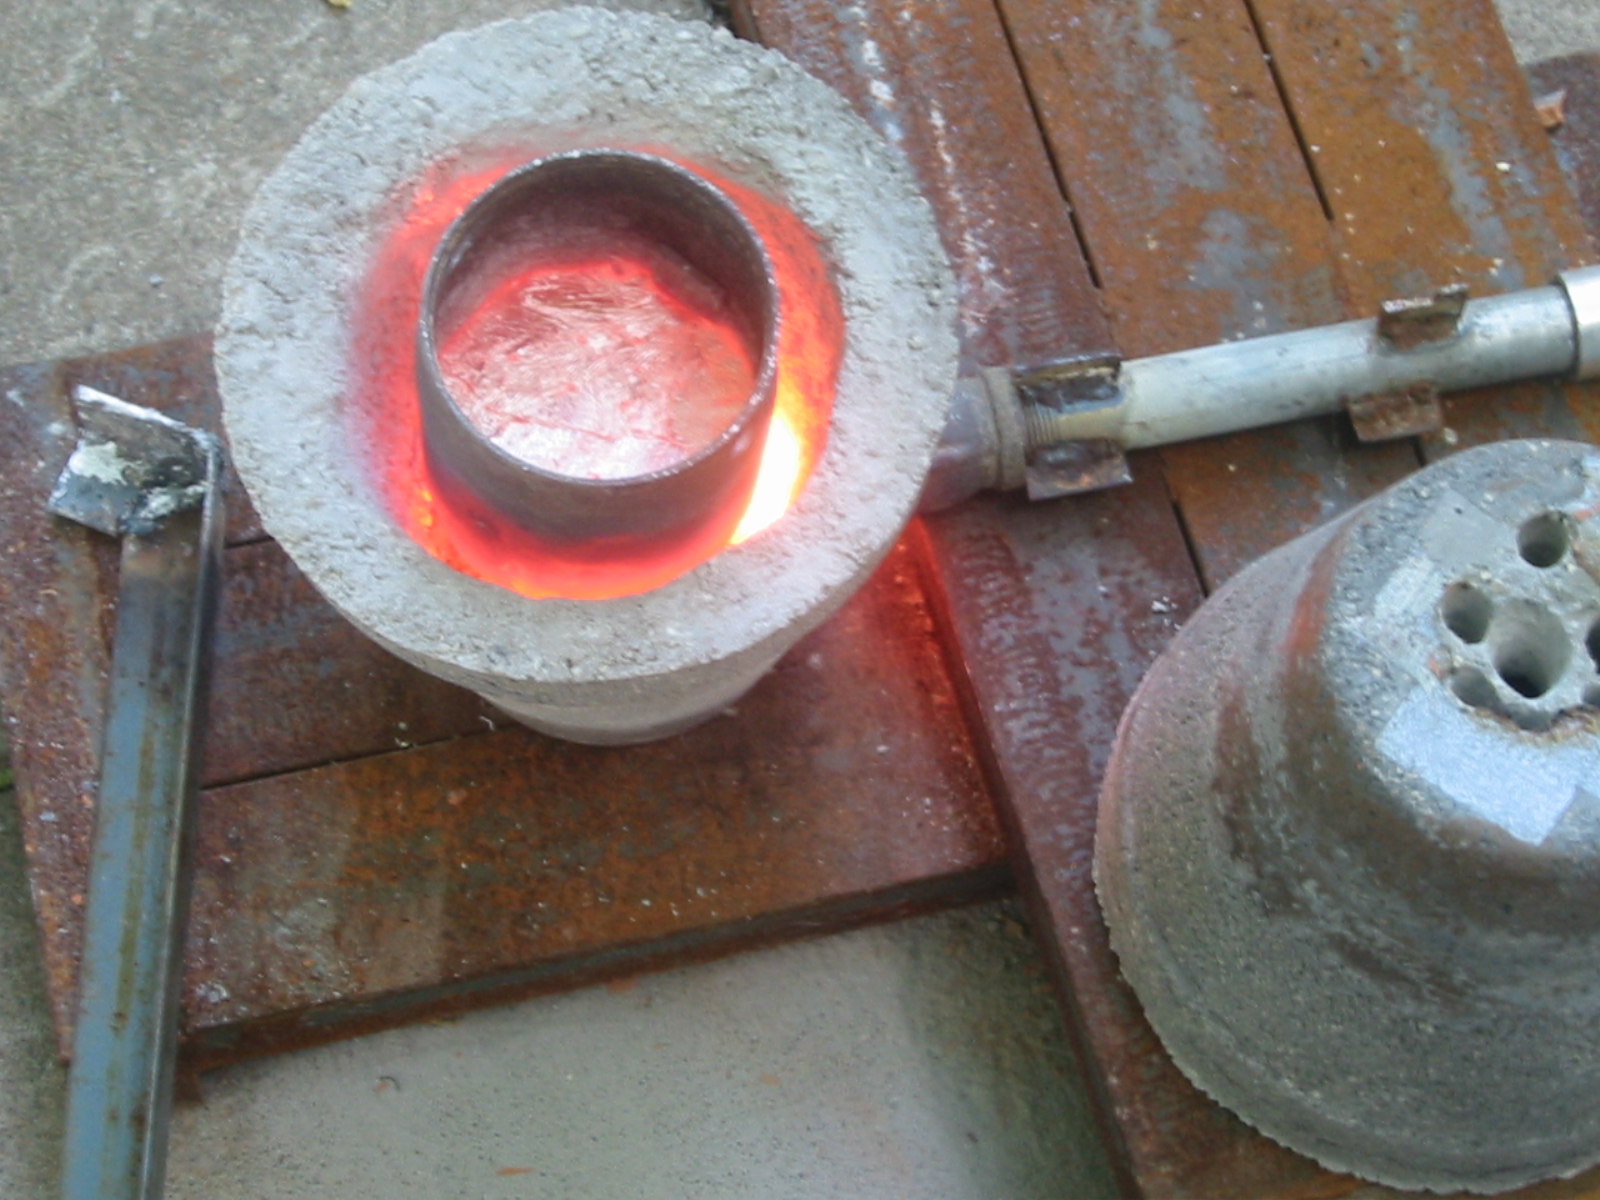
Iron Foundry 3000FFor the hotter metals like NiBrAl at 2300F to Iron at 3000F must use a clay or silicon carbide crucible. So your foundry gets built around the crucible. An A30 crucible is about 11 1/2" tall by 8 5/8" wide and can hold 66 pounds of brass, 21 pounds of aluminum. Plenty for making our propeller blades and most everything else you find on a boat. You need about 1 1/2" clearance around the crucible, so the inside diameter of the foundry needs to be 11 5/8". The wall of the furnace is about 3 inches thick and can be 3100F castable furnace refractory or a combination of 1" thick castable refractory and 2 inches of ceramic fiber or castable refractory mixed with styrofoam pellets or perlite in order to cut down on weight. In either case the outside diameter is 20 1/2". The height is the crucible + a 3" thick bottom, 1 1/2" plinths to lift the crucible and allow for some flame under it + 11 1/2" tall curcible + 1 1/2" clearance over the top of the crucible for a total of 17 5/8". Then the lid is another 3" thick and the base is 4" so the overall height just under 25" Resourses: Ceramic Fiber - Arlie Medina at Thermal Specialties in Tulsa at 6314 East 15th Street Suppliers: Burner Parts:
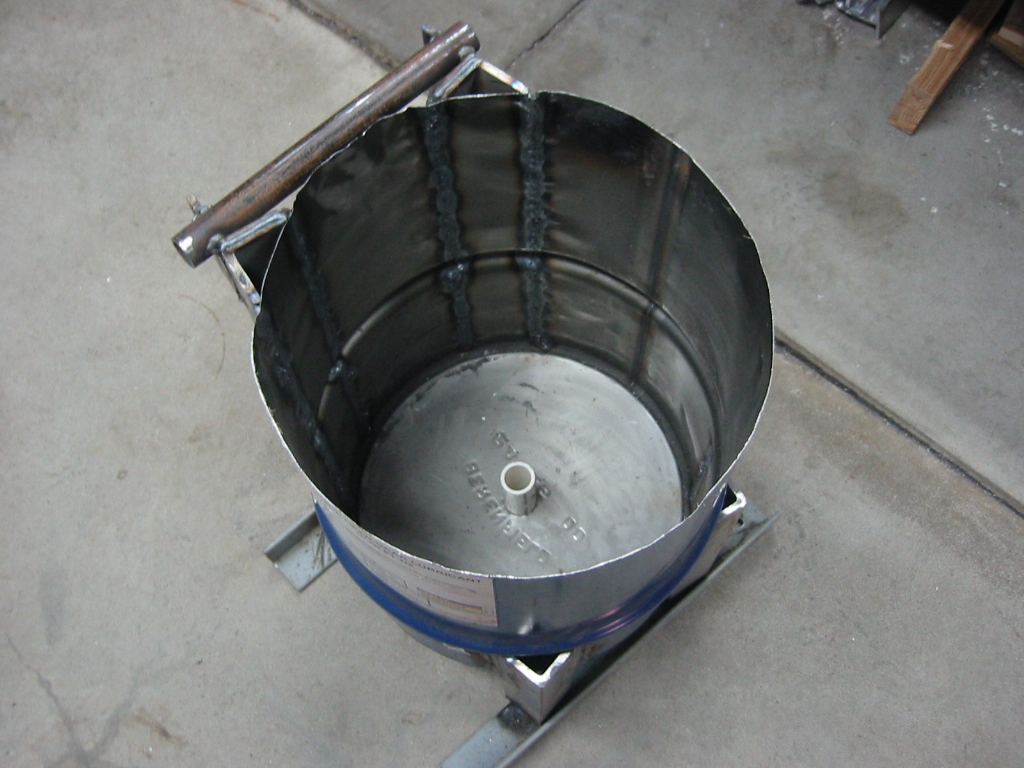
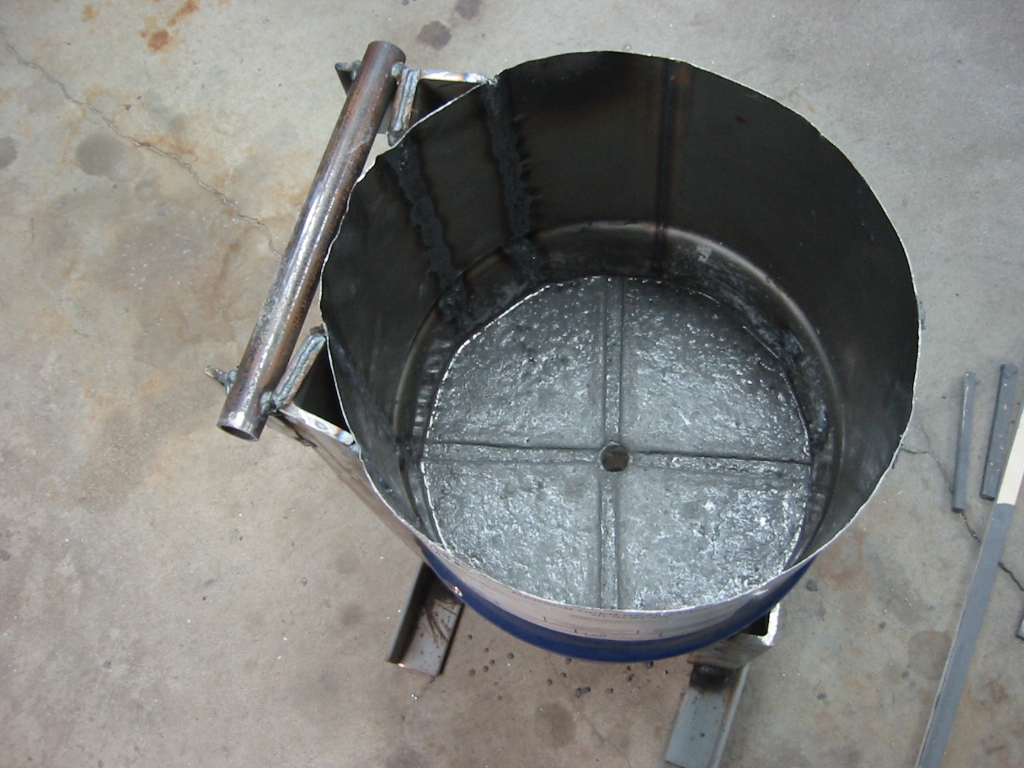
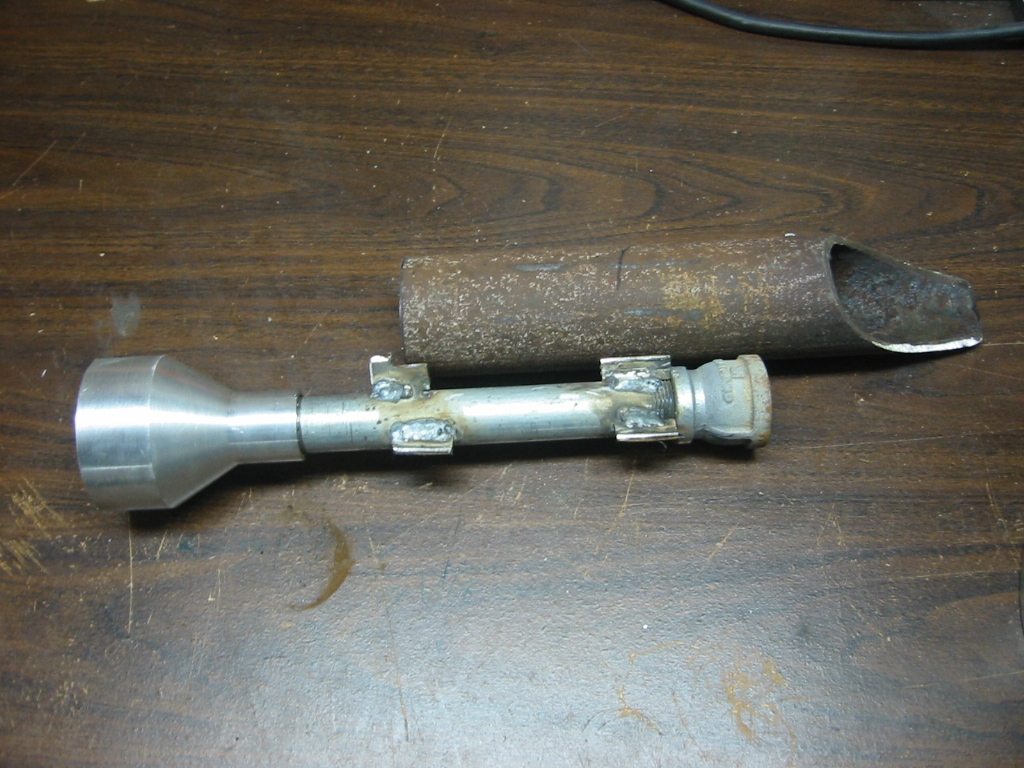
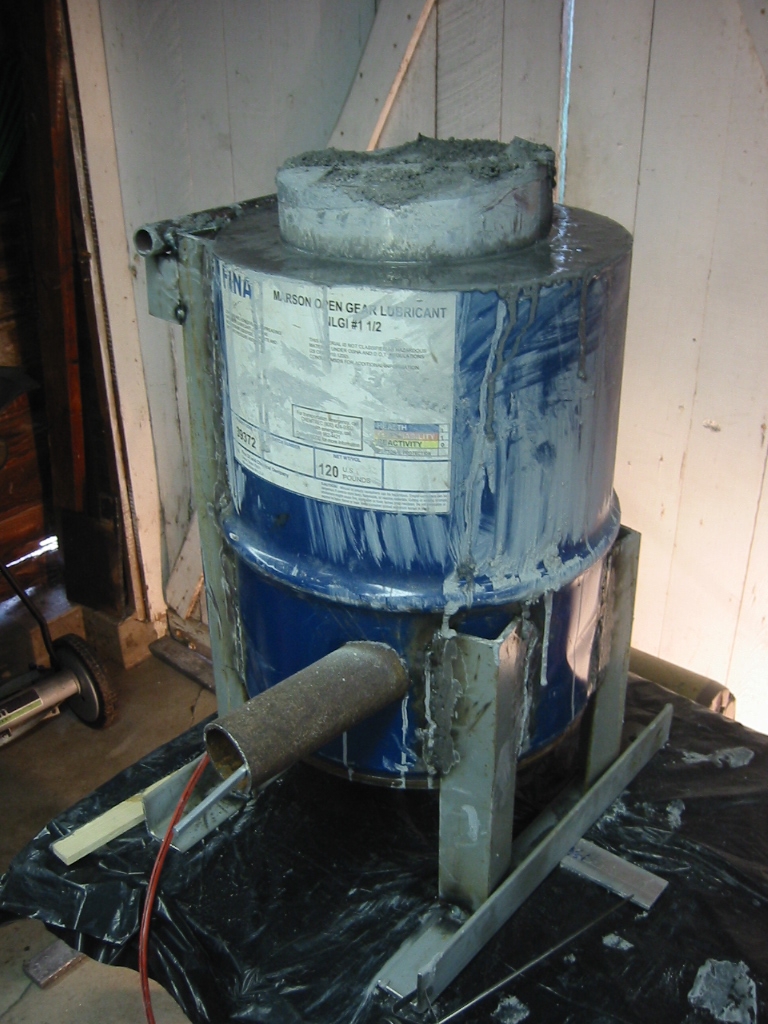
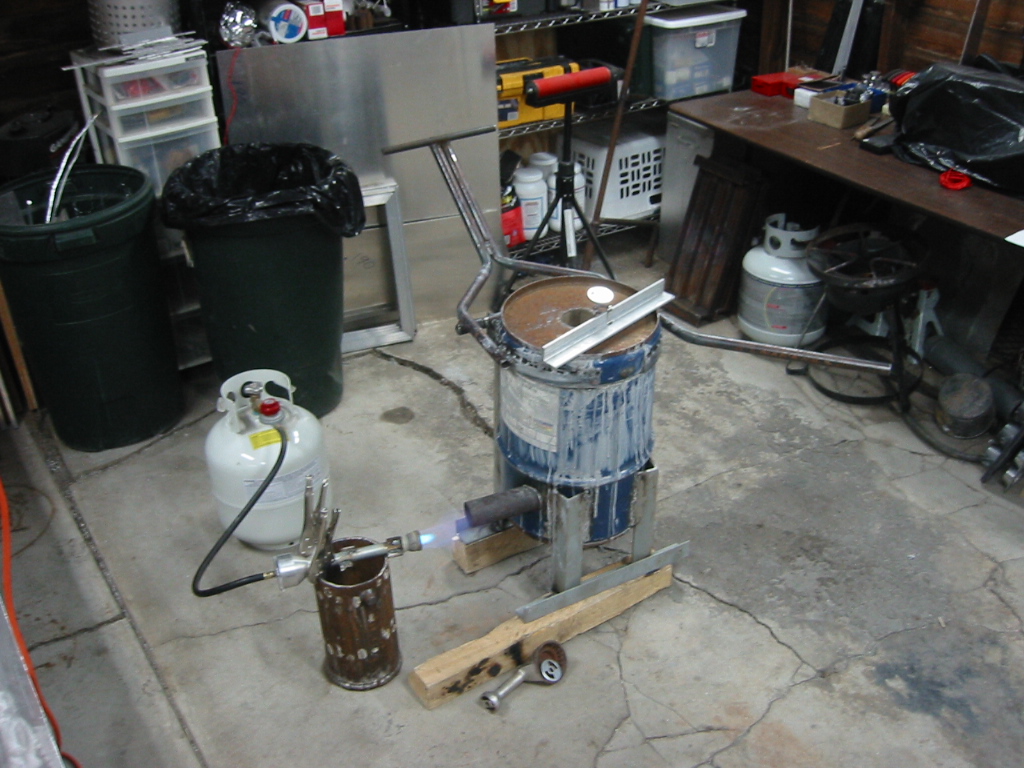
Aluminum Foundry 1500F - LargeMy foundry started from reading several of the very good web sites available on the topic. See the links at the bottom of this page. I wanted to melt upwards to 15 pounds of aluminum so I started with a crucible (the actual melting pot) that is a little bigger than a standard #10 crucible. My crucible is made from a 6 inch by 1/4 inch thick steel pipe with a 1/2 inch plate of steel welded onto the bottom. After a trip to the local junk dealer, the metal scrap yard, and a foundry supplier I had all of the parts. I made a simple burner using parts from the turkey fryer burner I picked up and used to melt lead. A couple of of 30 gallon oil drums ($4 each) from the local junk dealer would form the body, and Mizzou Castable Refractory from a local supplier provides the heat resistant insulation. I had been working mainly with with aluminum up to this point. Cutting steel with my Dewalt cut-off saw wore out to $90 blade is short order. Since it cost $40 to sharpen I had an excuse to buy an acetylene touch but I decided to first try a cutoff blade in my grinder first. Harbor Freight sells a box of 25 - 7 inch metal cutting disk for $14, and a cheep angel grinder will cost $20 to $30. Surprisingly the cut-off blades worked great. (1) One of the 30 gallon drums was cut off at 18 inches to make the bottom of the furnace. Angle iron was added for 4 legs and to support a pipe that would be the hinge for the lid. The oil drums are 14 inches in diameter which is just right for my 6+ in wide crucible + 1 inch of space between the crucible and the refractory so that the refractory is about 2 1/2 inches thick. (2) The lid is 2 1/2 inches cut off of another barrel. These barrels have lids like paint cans, so instead of trying to weld on a lid I just used another $4 barrel. Others have used pressure storage tanks used by household water well systems and except that these are rounded on the top, I think they are a better solution; unless you are good at welding on the thin metal that the 30 gallon barrels are make from. I am not.
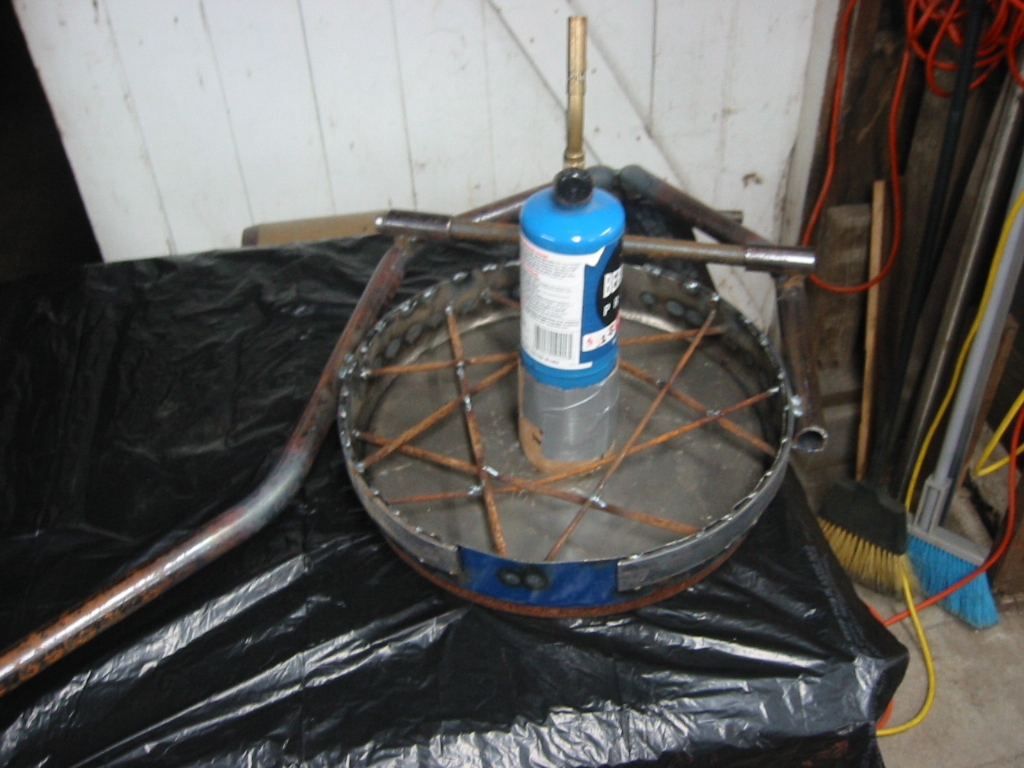
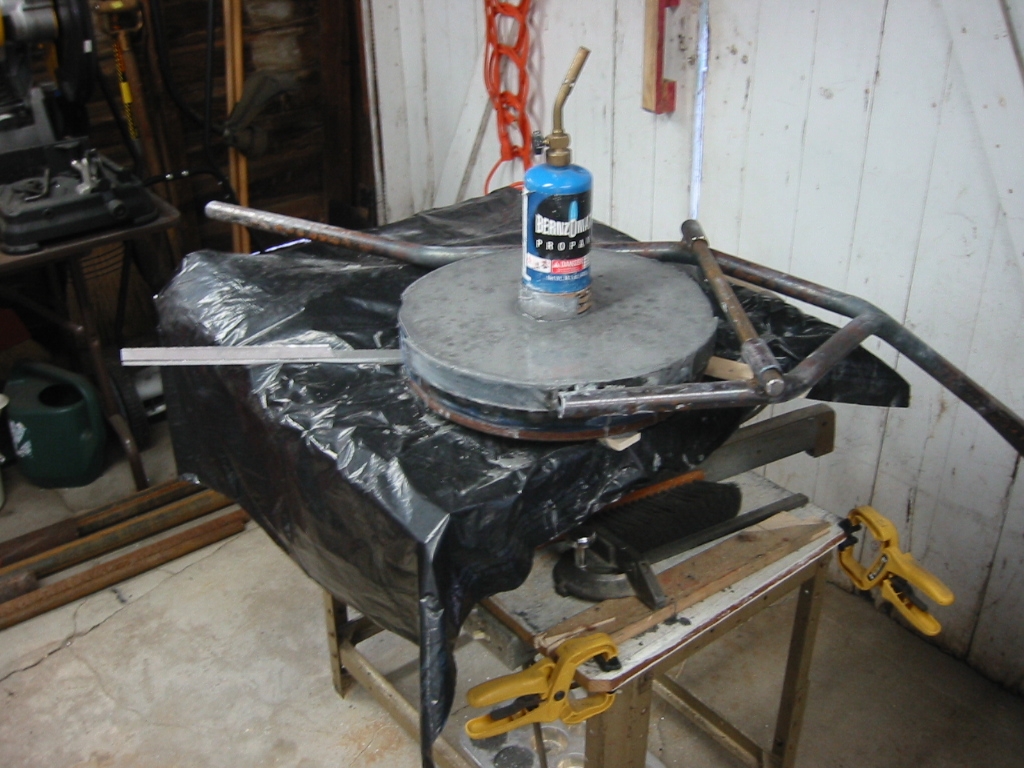
Mizzou Castable RefractoryRefractory is the material you use to insolate your foundry. You can make your own refractory but I was having problems finding the materials, so I went the lazy route and purchased Mizzou Castable Refractory. As much as this stuff looks like concrete, it is not concrete, it also has a 30 day self life, which is your ticket to a low price. When I went to return a couple of unused bags of Mizzou I saw they had a complete pallet of the stuff sitting out in the rain because it had gone over its 30 expiration date, they would have let me use that for free. I asked why they had so much of it on hand, and it turns out they make crematorium pans, which are the slabs that go under the body when it is placed into the furnace. The employee then pointed to a metal building on the other side of the loading yard with 2 large stacks belching smoke and explained that they also run a crematorium. Read the instructions! Mizzou is mainly alumina, which is aluminum oxide. Wear a respirator, gloves and wash up after using it. It took 4, 55 lb bags at $27 each to complete my furnace. You only use 5 pints of water for each 55 lb bag so it looks like very dry concrete. The trick is to vibrate this stuff, and if you have an old table saw then you have the perfect vibrator. Just lower the blade, cover it with plastic, turn it on, and let it vibrate your refractory. (3) I poured the lid first so I could see how it
worked on a small part. You can see the small steel bars welded in
to reinforce the refractory . This is only done in the lid, so that
the refractory is supported when it eventually cracks. A butane
torch with a piece of cardboard wrapped around it sticks through a
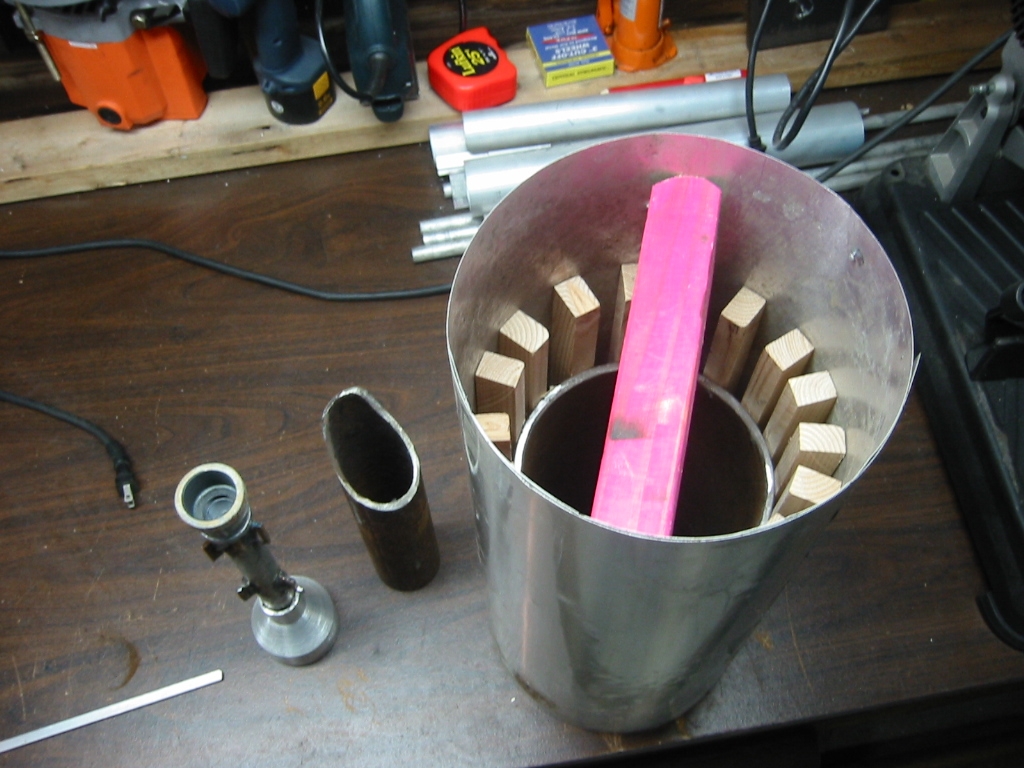
hole in the lid. This will form the site hole and vent in the top. (5) While the bottom was drying I made a crucible or melting pot, from a 6 inch steel pipe with 1/2 inch plate steel welded on the bottom. The crucible was then used to make the center form for the refractory. Wooded strips 1 inch wide were glued to the crucible with dabs of Liquid Nails and then those were wrapped with aluminum flashing. The flashing was cut and folded over to close off the top in order to make it easier to shovel in the refectory without have to try and miss the opening to the center form. (6) (7) With the bottom dried, the center form was set in place along with the burner inlet pipe which is a 2 inch steel pipe shaped to fit the curve of the center form. It is held in place with Liquid Nails and a piece of metal that is inserted in the pipe and pierces the center form. (8) I had enough leftovers to make several plinths and a flower pot furnace. Plinths are small blocks that support the crucible above the bottom of the furnace. The flower pot furnace is so named because it is simply a couple of flower pots lined with Mizzou. The flower pot furnace is great for small jobs because is heats up in about 10 minutes. (9) Curing will be many hours spent gradually heating up the furnace. The Mizzou Refactory came with a very specific set of instructions but I did it over multiple evenings, using heat lamps the first couple of nights, then the next night I started with the burner. About 5 or so hours with the burner pulled back out of the burner pipe, turned down low and only partially venting through the pipe. In order to achieve 250 degrees F, then higher temperatures on 4 consecutive nights until we were melting aluminum. After the first 3 hours above 250, steam was escaping from my porous welding job, so I would not recommend any faster curing than several days.
|
||||||||||||||||||||||||||||||||
|
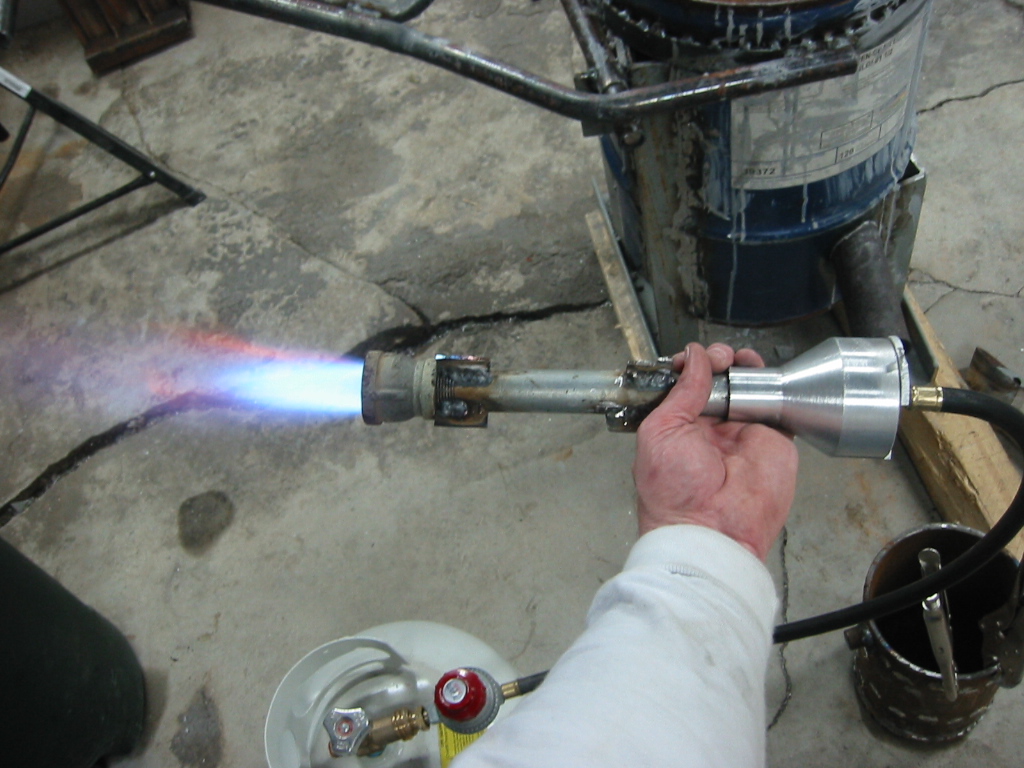
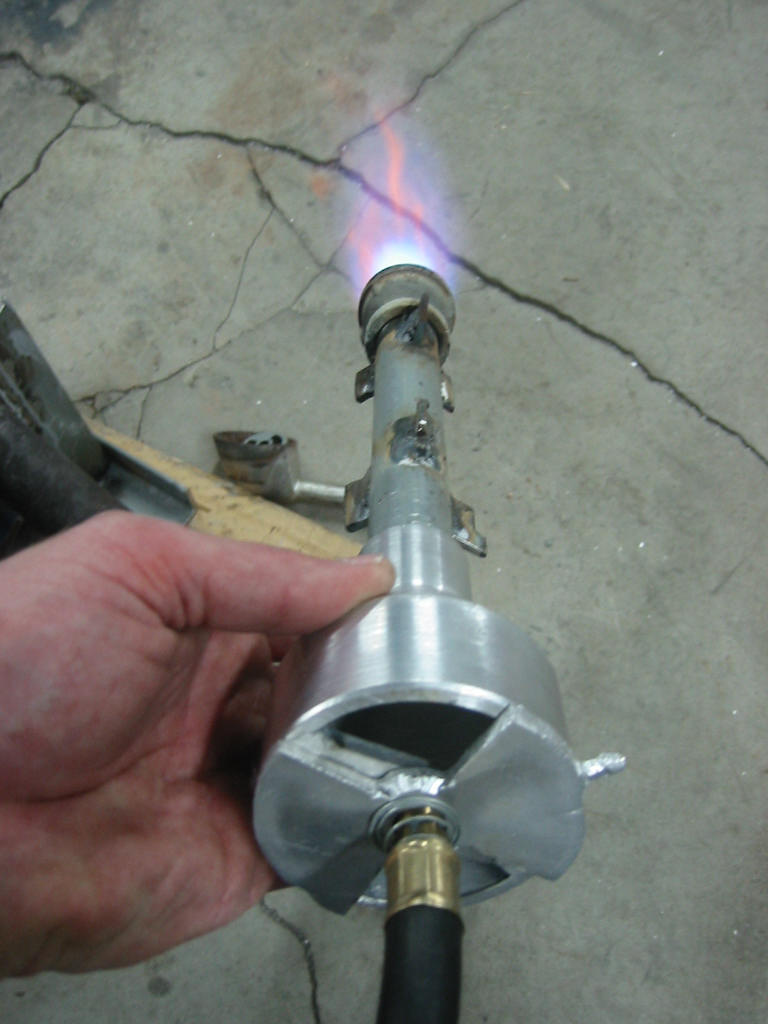
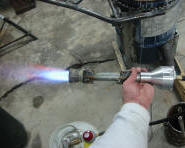
I also welded 6 small bits of flat steel onto the 8 inch nipple. This keeps the burner centered in the burner pipe which allows for additional air flow around the outside of the burner. One of the tabs of steel is notched to prevent the burner from sliding too far into the burner pipe. Make sure to keep the gas turned up enough to keep the flame burning only at the flared end of the burner. If too low the flame will burn back through the 3/4 inch pipe and start burning inside the intake bell. This will cause the gas hose fitting to over heat and it would soon melt of and catch fire. The propane tank would be next and after that blows up you would not need to worry any more.
I tested the foundry with a small melt and it worked great. I takes 30 minutes to melt a couple of pounds and over an hour for about 8 pounds. Larger burners will do the job in 15 minutes and that seems important to many people, but there is always something else to do other that watch the water boil. Also you really do not want the aluminum to get much hotter that it's melting point of 1300 degrees. I tried adding a blower taken from a discarded dryer, in order to force more air thought the burner and increase the efficiency, but just a small amount of additional air caused the burner to blow out.
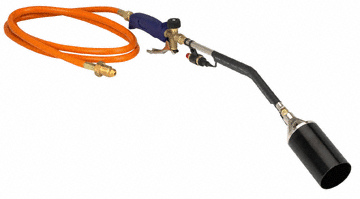
(12) I recently purchased a propane torch from Harbor Freight; www.harborfreight.com, for $30. It has a knob that can adjust the flame and no regulator. This thing is like is the fires of Hell compared to my old burner. Go get one and see what the preacher has been talking about!
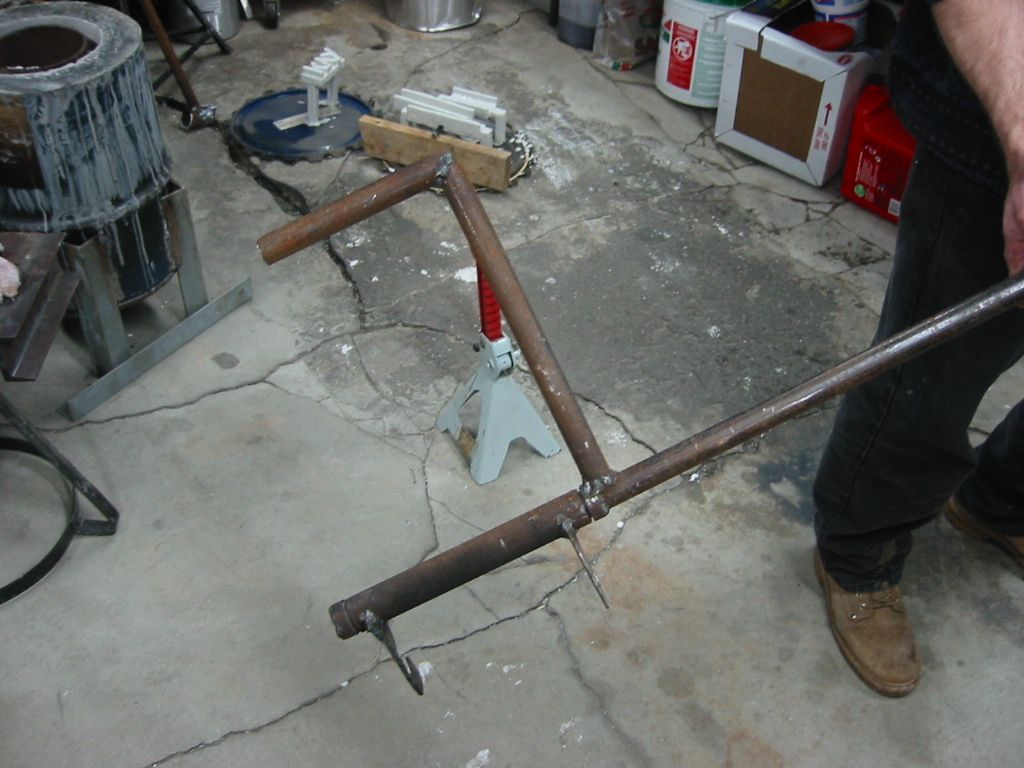
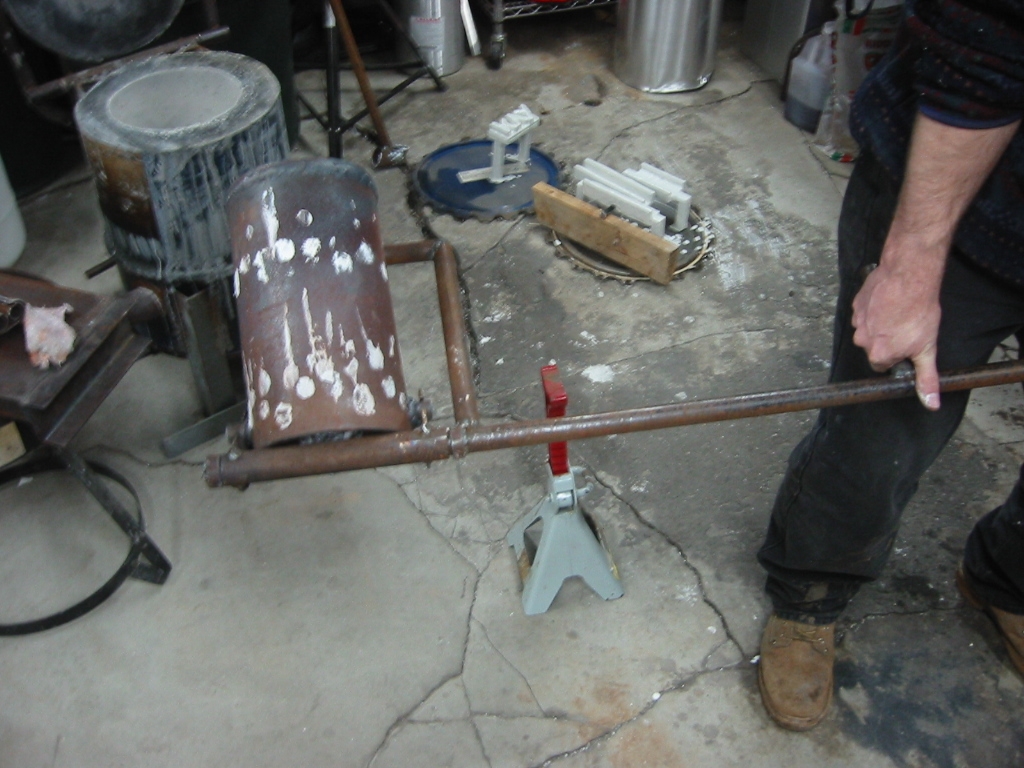
Crucible Tool
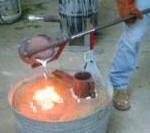
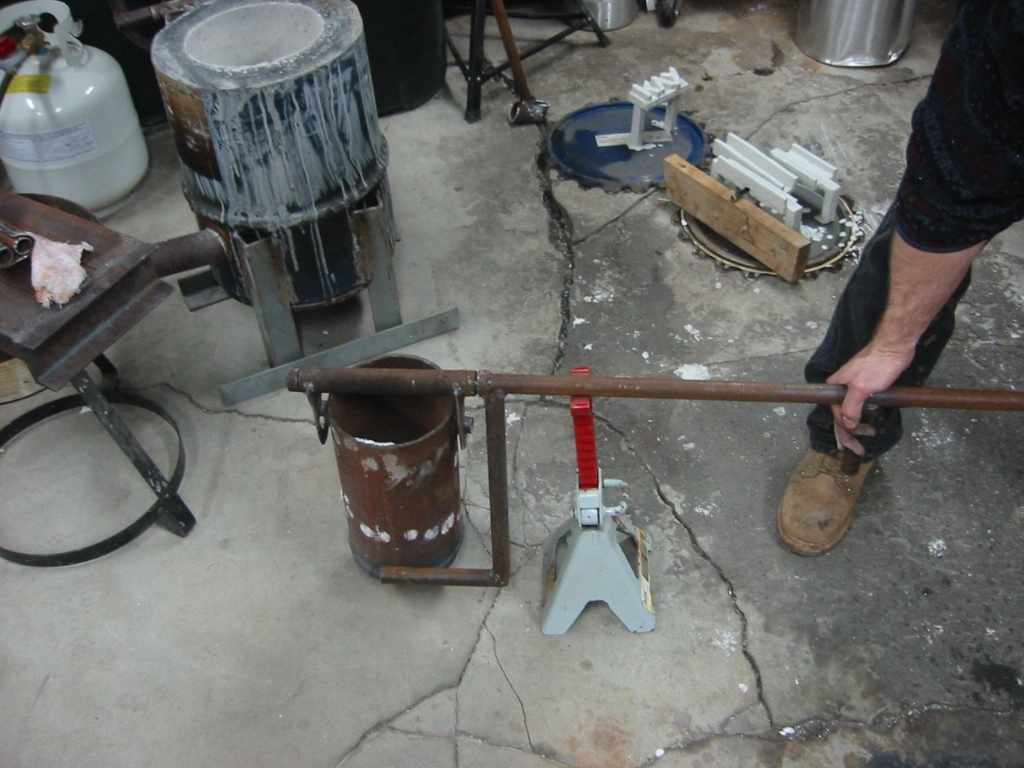
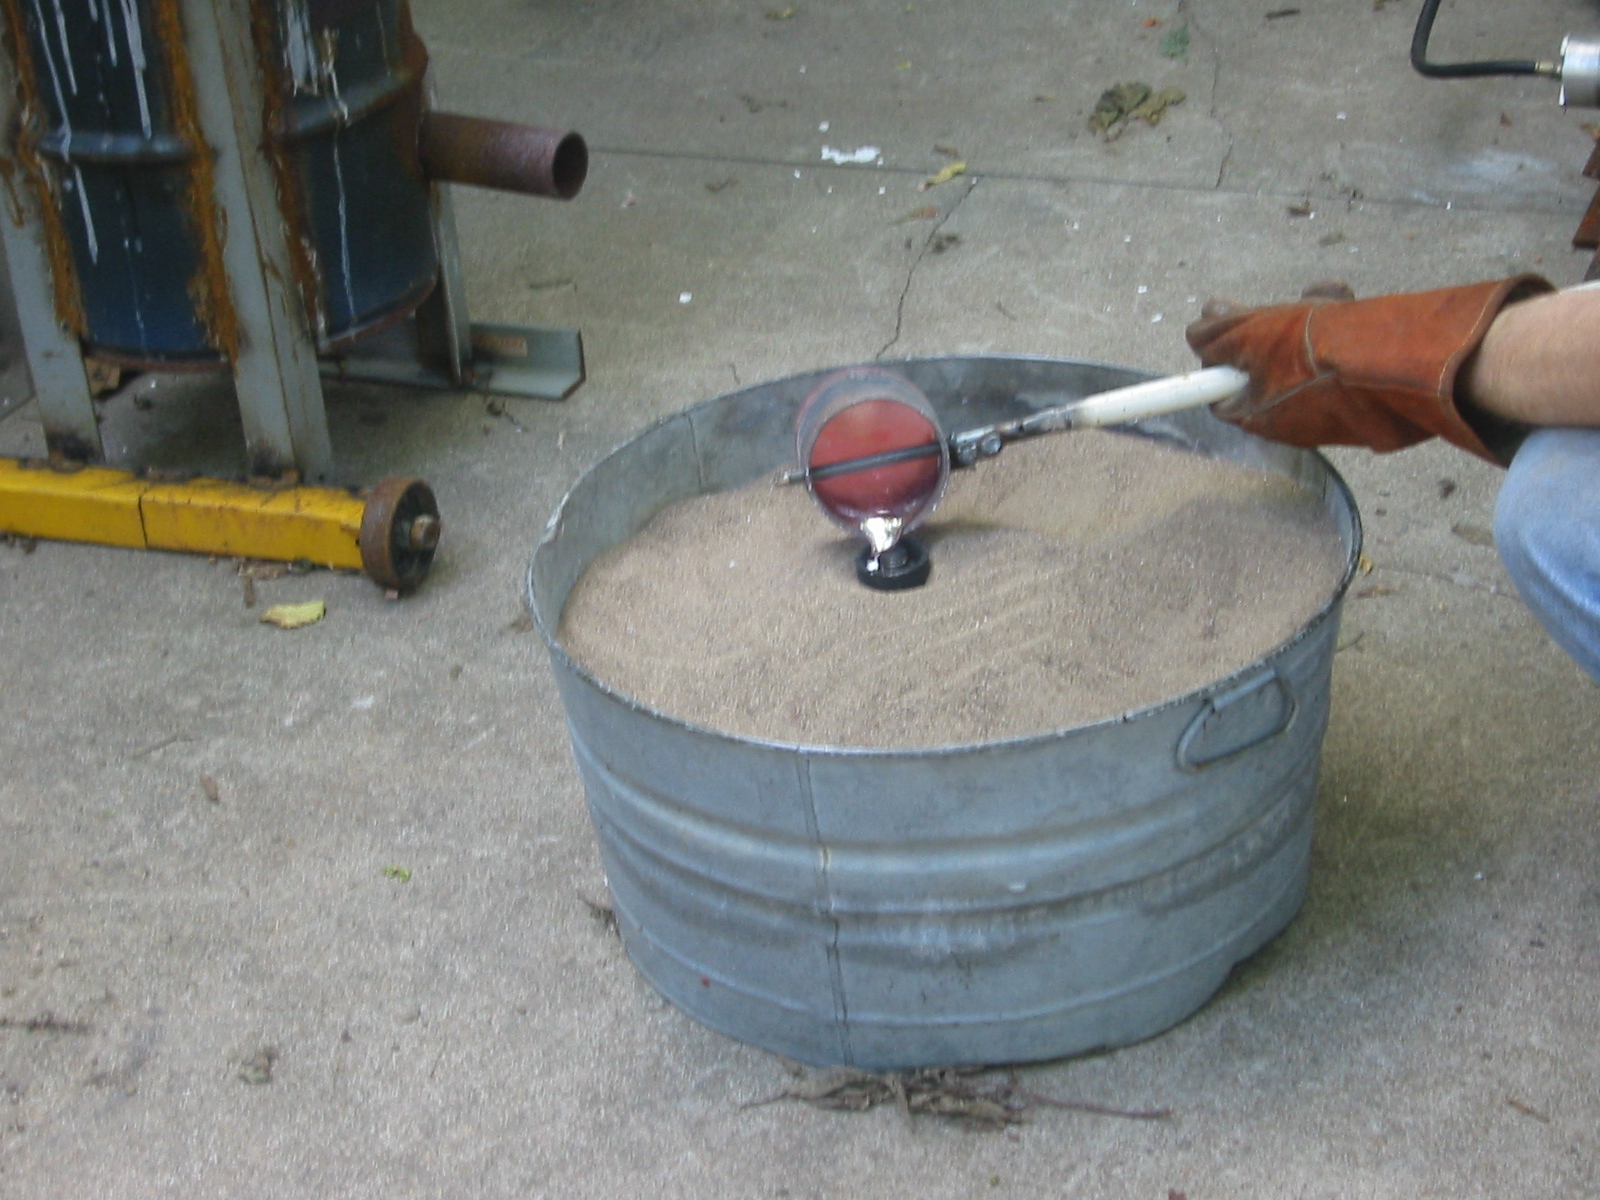
(13) I was very happy with the crucible tool. The design is a hybrid of a couple of others I saw. It has 2 hooks that can reach down into the furnace and catch 3/4" studs welded onto the top outside edges of the crucible. The hooks are welded to a 7" piece of pipe that swivels on the tools handle. (14) (15) Once the crucible is lifted out of the furnace the handle is rotated allowing the hooks to swivel and the tilting arm which is welded to the handle to rotate down and catch the bottom of the crucible. (16) The crucible can now be tilted for the pour. The photos are only a demonstration, I'd be wearing gloves if this was real, and the spots on the crucible are just ash from the Liquid Nails that was used to hold the wood furring strips in place when the crucible was being use as part of the from to cast the furnace.
If I had to do this again I might build my furnace
so that the lid included about 3 inches of the side of the furnace.
This would increase the weigh of the lid, but the crucible tool
would be much simpler. I could then cut holes in the side of your
crucible and just slide end of the tool through the holes. You would
want some notches in the tool to help keep the crucible from sliding
off but you eliminate the need for the swivel, the hooks, and the
the studs on the crucible.
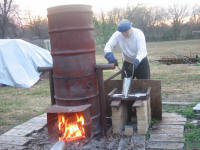
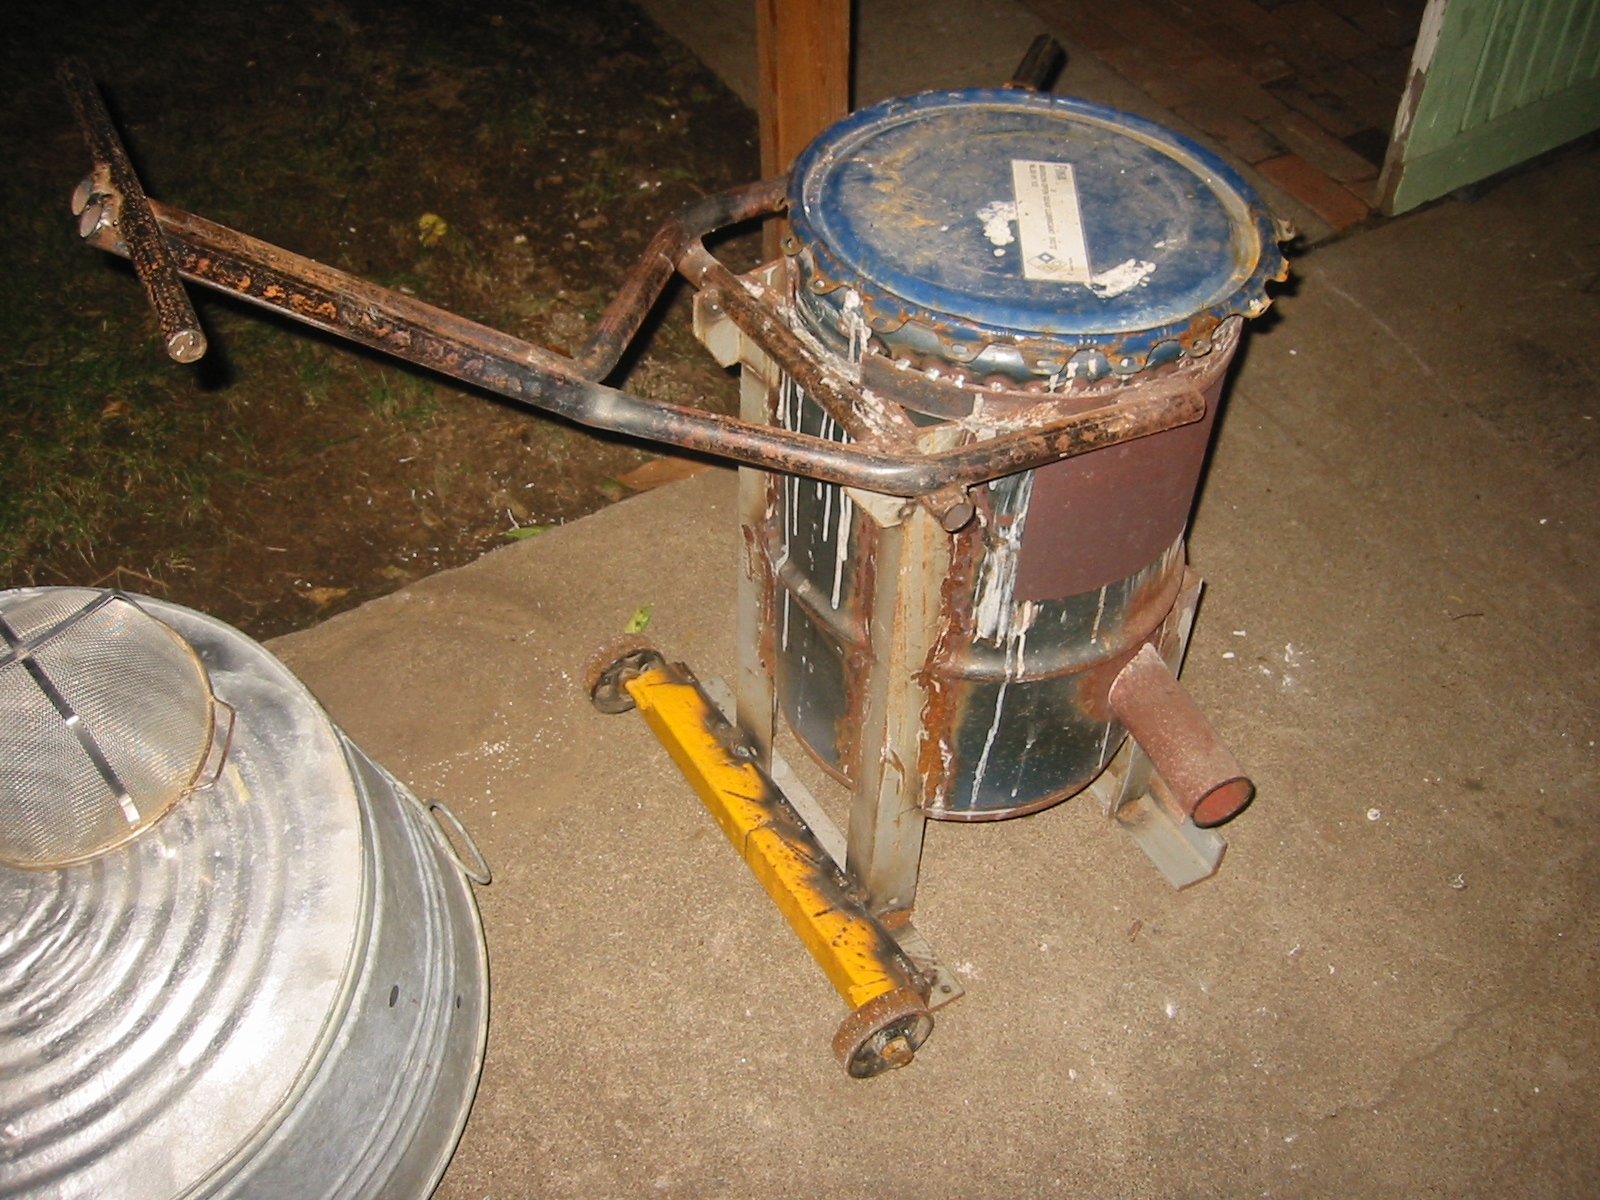
(17) It's been over a year and I finally got tired of dragging the
foundry around while stepping over the engine stand laying in my
drive way, and 15 minutes latter the rest of the engine stand is in
the scrap pile and its wheels are welded onto the foundry. What a
wonderful improvement. Just tilt her back and roll it out of the
way. The original oil drum lid is to help keep some of the rain out.
Aluminum Foundry 1500F - Small - aka
Flower Pot Foundry
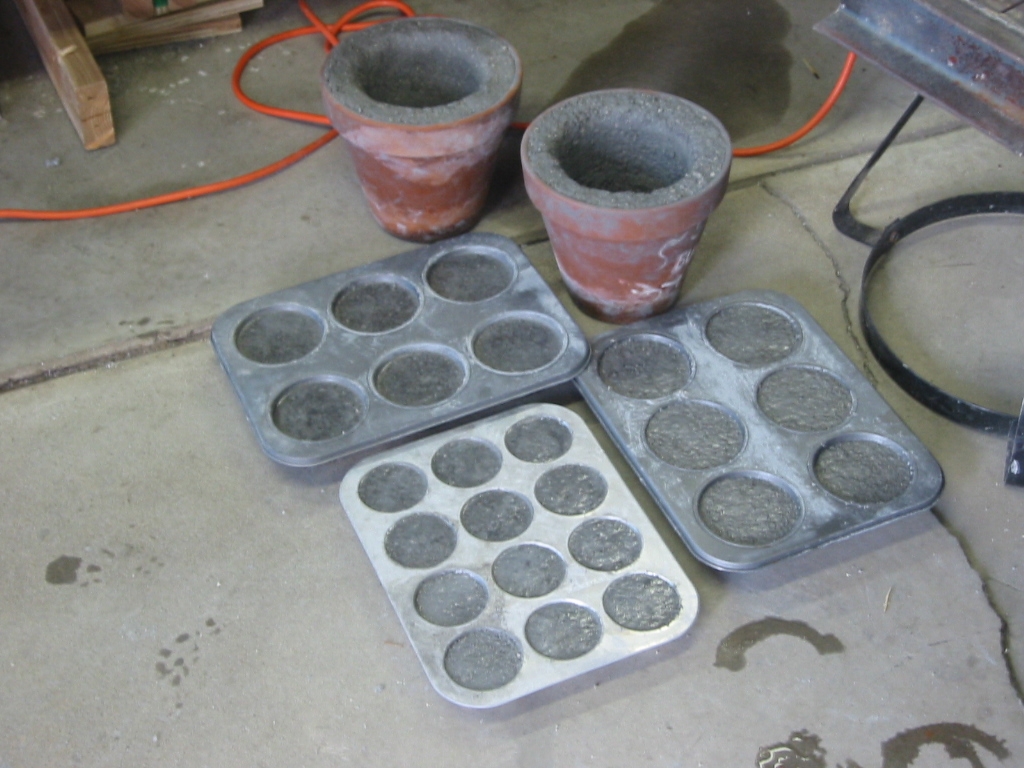
(1) Months ago, when I was building my large foundry I had some left over Mizzou Castable Refractory and so I made some plinths and a flower pot furnace. The flower pots were just normal clay pots borrowed from a pile the neighbor had beside his house. Ok, I stole them.
|
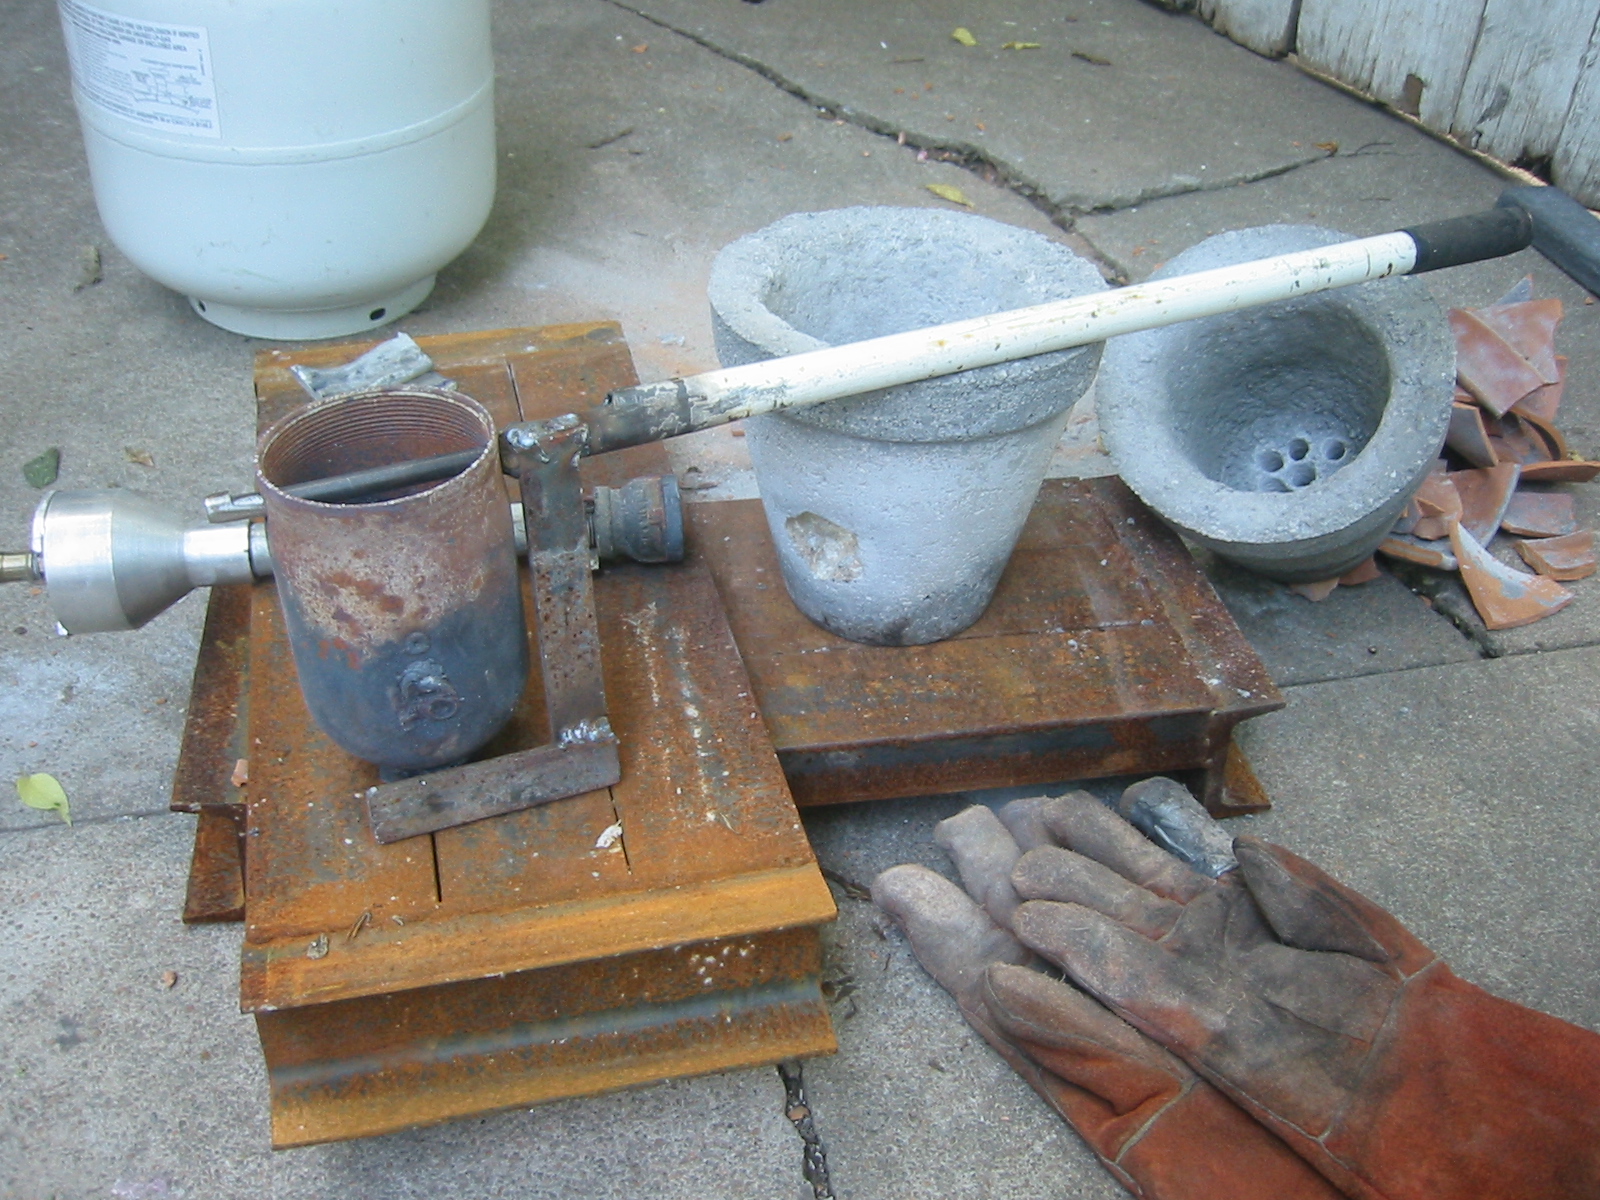
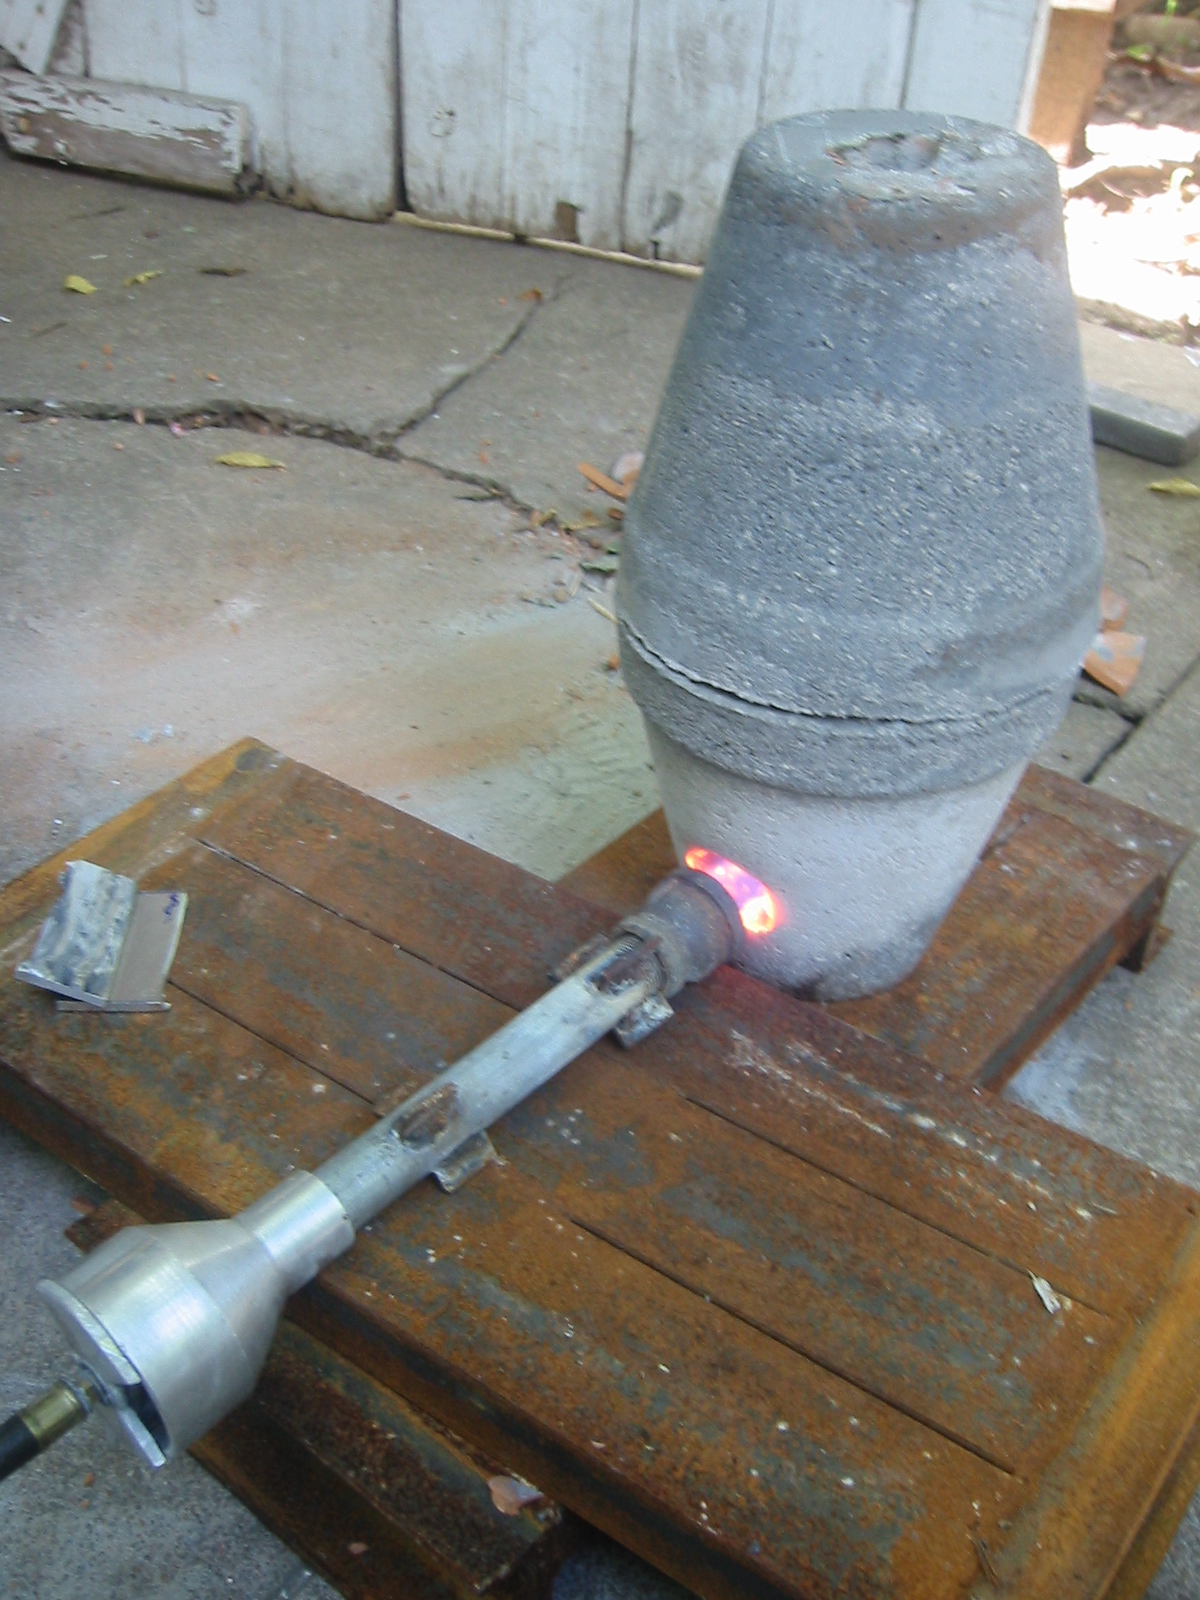
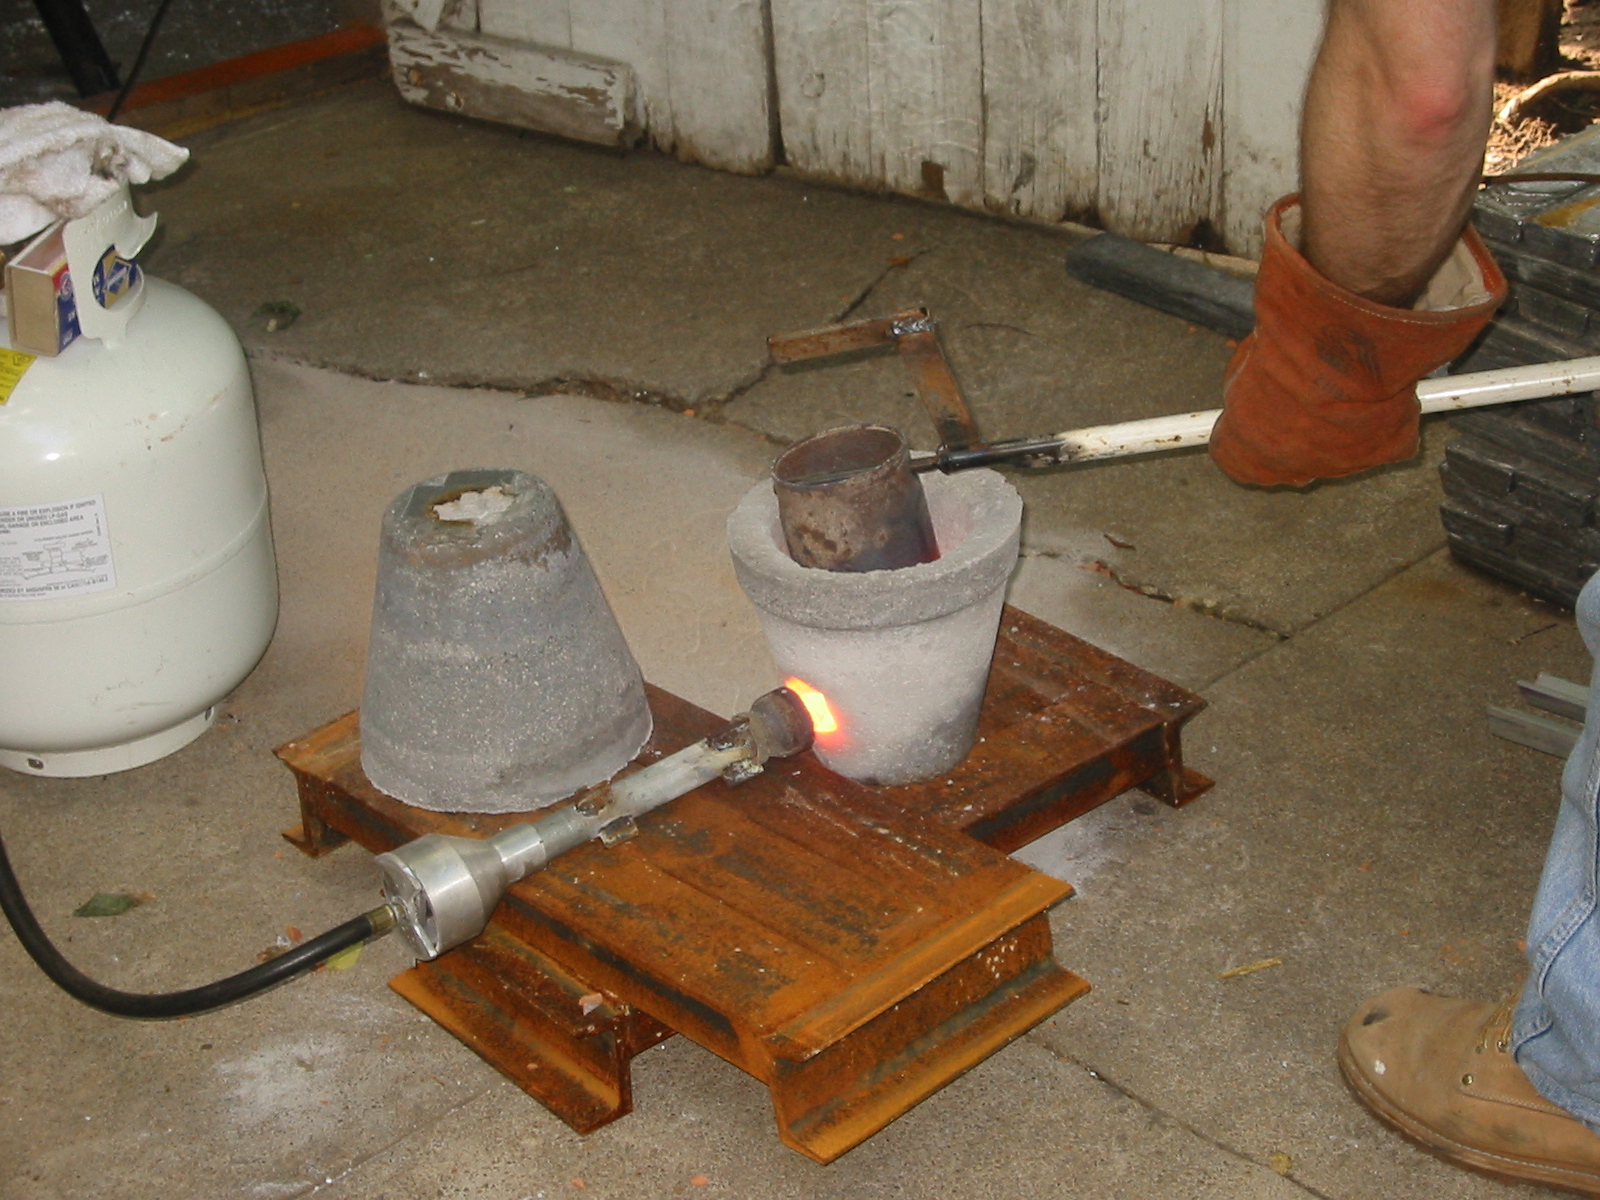
(2) Well today I finally needed just a small amount of melt and so I finished making the Flower Pot Foundry which still needed a burner hole and a sight/vent hole. I used a standard 1/2 masonry drill bit and drilled several holes to make a crude hole about 1 1/2 inches wide for the burner and several more in the the top for a vent.
(3) The burner is only resting on steel and the flame directed through the burner hole. (4) The crucible is made from a gas cylinder cap I found on the high way, and a couple of bits of steel have been welded in to close off the holes on it's sides. Another couple of bits of angle have been welded to the bottom to support it off the bottom of the furnace. (5) Finally two new 1/2 inch holes have been drilled at the upper lip, which allow the crucible to be lifted with a custom crucible tool. (6) The crucible tool is a jack handle with a 3/8 inch bolt welded onto the end and then the bolts head was cut down so that it became a slight hook in order to prevent the crucible from sliding off. An couple of pieces of flat bar are also welded to the handle so that when the tool is rotated they catch the bottom of the crucible in order to tilt it for pouring.
I didn't have to remove the clay flower pot from the castable refractory; just heating it up once for about 4 minutes to help cure the refractory did that for me. This refractory had been sitting in a dry spot for months so curing was not much of an issue, otherwise the refractory comes with very specific instructions for curing.
(3) This is the same burner I use in my larger foundry with is converted from a turkey fryer. The details for the larger foundry and burner are described above. The large furnace is great for melting up to 15 pounds but takes almost 2 hours and unfortunately it also takes about 30 minutes to melt just a couple of pounds because it takes a while to heat up all that refractory. On the other hand the Flower Pot Foundry melts a couple of pounds in just 15 minutes. There are always plenty of things to do around the shop, so it's not that I am in a rush, but I am cheep and the quicker melt time saves on propane. Not only that but handling the small crucible is much, much easier so pouring funnels are not necessary.
Links
http://manufacturing.stanford.edu
"How Everyday Things Are
Made" (Covers Casting)
www.backyardmetalcasting.com Back Yard Metal Casting
http://metalcast.boorman.us Brians Metal Casting Project (Well
documented plans)
www.budgetcastingsupply.com/Web-Links.html Budget Casting
Supply Links
www.budgetcastingsupply.com/Crucibles.html Budget Casting Supply
- Crucible Page
www.buildyouridea.com/foundry/lost_foam_howto/lost_foam_howto.html
Lost Foam How To
www.dansworkshop.com Hot Wire Lathe and Foundry
Suppliers:
Gypsum Solutions
www.gypsumsolutions.com Local Distributor: Independent
Materials, 34 N Owasso Ave. Tulsa, OK 74120 Phone 918-582-0196
Casting Plaster and Molding Plaster (Plaster of Paris) $20/100
lbs
Ryder Brick, 14601 S Memorial Dr, PO Box 550, Bixby, OK
918-366-8200
Firebrick 9x4.5x2 $1.10 each
Canfield & Joseph Inc, 6536 E 42nd Tulsa, OK 918-663-8380
Petrobond Pre-Mix .60/lb (50lb box). Warehoused in Kansas City
100lbs Petrobond Pre-Mix is $60 + $34.64 shipping + 5.11 tax =
$99.75 (May 2004)
Bryant Industrial, 6802 S 65th West Ave, Tulsa, OK 74131 Phone 918
446-1481 - Mazzo Refactory Mix 55# 26.95
www.creativepackagingok.com Polystyrene Foam 4' x 8' x 40" (Bun)
for $179.20
Budget Casting Supply
http://budgetcastingsupply.com
Petrobond Pre-Mix 100lb box is $124 (May 2004)
Router Bits
www.toolbarn.com
1/2" 2-Flute 1/2" Shank C/T Straight Plunge Cutting Router Bit
Forum
http://groups.yahoo.com/group/hobbicast
![]()